Ingredients for 1 servings:
- 10 m.-sized eggs
- 2 cups sugar
- 2 cup(s) oil, neutral (e.g. sunflower oil)
- 2 cup(s) carbonated mineral water
- 400 g hazelnuts, ground
- 2 cup(s) cocoa powder, instant
- 2 packets of baking powder
- 4 cups flour
- 3 packs of dark chocolate coating
- 2 packs of cookies (mini butter cookies with chocolate)
- 1 pack of wafer rolls
- 3 packs of biscuits (double biscuits with various fillings)
- 1 bar of chocolate (Ritter Sport Schoko Duo)
- 1 pack of confectionery (mikado sticks)
- 1 pack of sweets (Smarties, large pack)
- 3 packs of chocolate (small Toblerone)
- 1 pack of cereal (colorful crisps)
- 4 ice cream cones
Instructions
Working time approx. 6 hours; Rest time approx. 30 minutes; Cooking/baking time approx. 1 hour; Total time approx. 7 hours 30 minutes
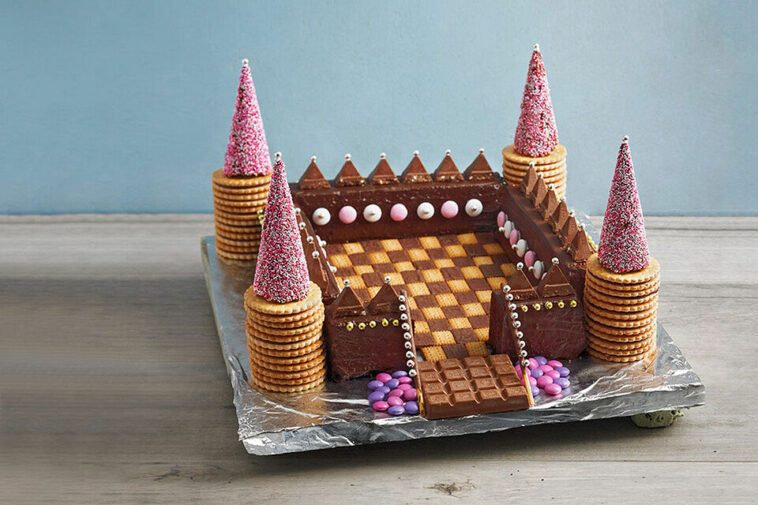
For the sparkling cake, beat the eggs until frothy and gradually add all the ingredients until smooth. Divide the cakes between two prepared loaf pans. Bake in a preheated oven at 175°C (top/bottom heat) for about 60 minutes on the second rack from the bottom. Do the skewer test! Remove the cakes from the pan and let them cool. Glue the sandwich biscuits together to form towers with melted chocolate. Spread the chocolate on the ice cream cone cones, roll them directly in the crisps, and then let them harden. Cut each cake in half lengthwise. Cut off the curved side so that each half stands upright. Melt the chocolate and spread it on all sides (except the cut-off parts). Let it harden thoroughly, ideally in the refrigerator. Arrange the butter biscuit minis in a checkerboard pattern on the final base and arrange the hardened cake pieces in a rectangle like castle walls. Tip: A large cardboard box was folded in half and wrapped in aluminum foil as a base – but this is not sufficient for transport! It is best to use an additional solid base, e.g. a wooden board or a small tabletop. Glue the decorated ice cream cone cones to the four towers with the melted chocolate coating (briefly dip the edge into the chocolate) and align the towers between the cake walls, also secured with chocolate coating. Break or cut the Toblerone into pieces and attach them to the hardened cake walls with the chocolate coating to form battlements. Distribute the Smarties, sorted by color, under and around the Ritter Sport bar, which will be used as the goal/drawbridge, and use the chocolate coating to stick them to the side walls as lights inside the cake wall. Attach the Mikado sticks to the cake wall and the ice cream rolls to the towers and to the top of the goal with the chocolate coating. Finally, make some paper decorations (lettering, coats of arms, etc.) and stick them into the spires with toothpicks. Of course, there are no limits to your imagination when it comes to decorating and designing! It’s not just children who will be thrilled with this knight’s castle.

Facebook Comments