Contents
show
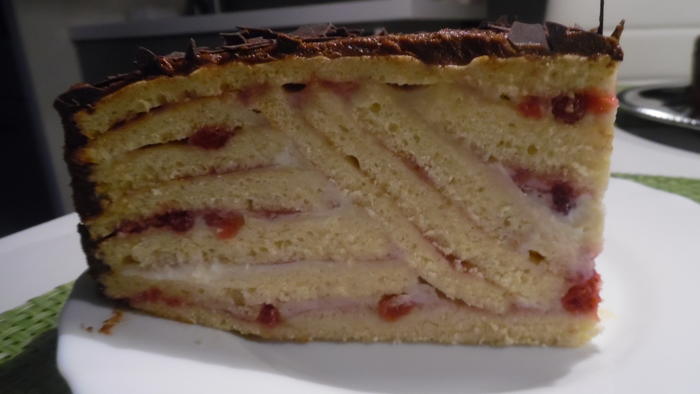
Lingonberry Layer Cake
The perfect lingonberry layer cake recipe with a picture and simple step-by-step instructions.
Dough:
- 12 Eggs
- 150 g Sugar
- 225 g Flour
- 225 g Food starch
- 3 tsp Baking powder
- 1 pinch Salt
Filling:
- 500 g Mascarpone
- 100 ml Cream
- Powdered sugar to taste
- 1 Pck. Vanilla extract
- 1 Glass Cranberries, in sugar
Completion:
- 1 Baking sheet
- 8 Sections Baking paper, slightly larger than the cake ring
- 1 Goal ring diameter 24 cm
- Chocolate cream or topping as you like, decoration too
Dough:
- Separate eggs. Beat the egg whites with the salt to a very firm snow. Provide. Preheat the oven to 180 °.
- Whip the egg yolks, sugar and vanilla sugar in a large bowl until whitish and creamy.
- Mix the flour, cornstarch and baking powder and fold alternately with the egg whites by hand into the egg and sugar mixture using a large whisk. No more flour should be visible. The mass is very voluminous, therefore a really large bowl.
- Now place a section of parchment paper on the baking sheet and place the cake ring on it and fill in enough dough so that it is evenly approx. 4 – 5 mm thick. Bake in the oven for about 8-10 minutes. It must no longer shine or turn brown. Take out immediately, loosen the cake ring and let the cake base cool down together with the paper on the upturned oven shelf outside of the oven.
- Repeat this 7 more times, so that you have 8 individually baked cake bases. Let them all cool down on the paper.
Filling:
- In the meantime, stir the mascarpone with the cream, powdered sugar and vanilla flavor to make a cream that is not too liquid. It is advisable not to add all of the cream right away so that you can determine the consistency. The cream must be similar to butter cream. You can also add the powdered sugar to taste. Yeah, after how cute everyone likes it. Prepare with the lingonberries.
Completion:
- 2 of the floors are required as a substrate and ceiling. The other 6 for the cut as follows: You leave the baking paper on the floor until you cut it or use it. The 1st floor remains complete and is placed on a cake plate with the paper up as a “base”. Then carefully peel off the paper and coat it first with the mascarpone cream and then with the cranberries.
- The 2nd floor is now placed on a separate base – but now with the paper facing down – and cut out in the middle with a cup or a small ring (approx. 5 cm DM). Then you carefully remove the inner part with the help of a knife without destroying it and put it aside, because you will need it for the next cutout. Now you turn the perforated cake base over and place it on the 1st base, peel off the paper and also coat the ring with the cream and the cranberries.
- Proceed in the same way for the 3rd, 4th, 5th and 6th floor, but you no longer take the first shape for the cutout, but always take the previous cutout, place it in the middle and cut about 5 mm away the next section all around. It always has to get bigger from floor to floor so that a “funnel” is created when the 6th floor is placed.
- The 7th floor must now be cut out in a circle so that the ring has the width of the depth of the funnel. After you have coated the funnel with the cream and the cranberries, you lay it out with the edge of the dough at an angle. What is left over can be used for the next shift. All other rounds in the funnel can be tinkered with the remaining cutouts. Here, too, each layer is painted over and over again before the next is applied. You do it for so long. until the cake is “closed” on top. It should be noted, however, that the fitted strips are always a bit narrower so that the surface is flat afterwards. The surface is then coated with the rest of the cream and the lingonberries and the 8th floor – again with the paper facing up – is placed on top as a cover and lightly pressed on. Then you peel off the paper and you can cover the cake all around.
- I used my homemade Nutella cream as a finish. But it also works with Canache (see my KB) or couverture, or depending on your mood. The imagination knows no limits. Good Appetite………….
Annotation:
- I saw this cake in a cafe and I was tempted to work out how it was made …… it cost me a few sleepless nights ……. :-), but it was fun. If that’s too much tinkering for you, you can simply layer the floors completely. However, they should really be baked individually, this gives a better hold. This is not a complex matter, and the thin floors can also be put together more stably.


Facebook Comments